Stylesheets
Cascading Style Sheets (CSS) are used to add layout and formatting to your templates.
The stylesheets tab is available to users with the "Manage Stylesheets" permission. It displays a paginated list of all stylesheets matching the current filter (if applied) in a tabular format. Each row of the table represents a single stylesheet. The columns of the table displays summary information about the stylesheet and provides some ability to interact with it.
A dropdown providing the ability to switch between pages of stylesheets that match the current filter will appear if more than one page of stylesheets match the current filter.
An options menu exists providing the ability to adjust the current filter, or to create a new stylesheet (depending upon permissions). The filter dialogue allows filtering, sorting, and paginating the displayed stylesheets by a number of criteria.
Tips
- Because Stylesheets are cached, absolute URLs are necessary. For example, use:
background: url([[root_url]]/uploads/images/background.png) repeat-y;(see Smarty section below for more details)
- There is a limit of 64k per stylesheet. If you need more, use multiple stylesheets.
- Use the cms_stylesheet tag in your Template. You only need this tag once, Stylesheets are combined into one call.
Advanced CSS Usage
CMSMS offers a lot of advanced features for Stylesheets, and with the ability to include Smarty tags, the possibilities are endless.
Multiple Stylesheets
Stylesheets are stored in the database, combined, and cached. This allows you to maintain separate stylesheets for layout, formatting, accessibility, etc., but only have one call to speed load times.
The order of Stylesheets is maintained, and can easily be reordered by drag and drop in the Current Associations list.
Using Media Queries
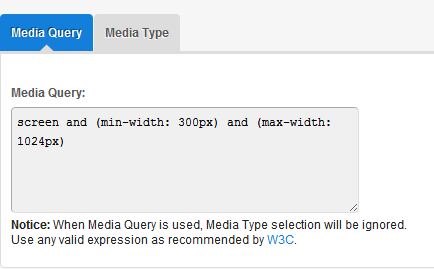
Within the "Media Query" textarea field any valid Media Query value as recommended by W3C can be entered.
After a value has been entered in "Media Query" textarea, "Media Type" checkbox options will be disabled.

Output of HTML Stylesheet tag would then produce following:
You are not only limited to using this newly introduced "Media Query" field but you can as well use @media rule inside your Stylesheet.
For detailed instructions look at W3C Media Queries Syntax.
Tag parameters
The cms_stylesheet tag allows for various parameters for special cases.
Smarty Processing
When generating css files this system passes the stylesheets retrieved from the database through Smarty. The Smarty delimiters have been changed from the CMSMS standard { and } to [[ and ]] respectively to ease transition in stylesheets. This allows creating Smarty variables i.e.:
at the top of the stylesheet, and then using these variables later in the stylesheet, i.e:
color: [[$red]];
}
Because the cached files are generated in the tmp/cache directory of the CMSMS installation, the CSS relative working directory is not the root of the website. Therefore any images, or other tags that require a url should use the [[root_url]] tag to force it to be an absolute url. i.e:
background: url([[root_url]]/uploads/images/error_background.gif);
}
Below you will find some examples for using Smarty in your stylesheets.
Global Settings and Color Scheme
Attach all stylesheets to the same HTML template, but the "Global Settings and Color Scheme" stylesheet should be first in line.
Stylesheet: Global Settings and Color Scheme
[[$theme_url = "[[root_url]]/uploads/template" scope='global']]
[[* +++++ COLOR SCHEME +++++ *]]
[[$color_text = '#333333' scope='global']]
[[$color_a = '#ff0000' scope='global']]
[[$color_a_hover = 'black' scope='global']]
[[$color_h2 = '#ff0000' scope='global']]
[[$color_h3 = '#f00' scope='global']]
[[$color_h4 = '#f00' scope='global']]
[[$color_h5 = '#333333' scope='global']]
[[$color_h6 = '#333333' scope='global']]
[[$color_footer = '#ffffff' scope='global']]
Stylesheet: Layout
color: [[$color_a]];
}
a:hover {
color: [[$color_a_hover]];
}
body {
color: [[$color_text]];
background: #fff url([[$theme_url]]/bg_body.jpg) repeat-x;
}
#main h2 {
color: [[$color_h2]];
}
#main h3 {
color: [[$color_h3]];
border-bottom: [[$color_h3]] solid 1px;
}
#footer p {
color: [[$color_footer]];
}
#footer p a {
color: [[$color_footer]];
}
Stylesheet: Some module
color: [[$color_text]];
}
Stylesheet: foreach example
Another example, to save yourself the hassle of writing vendor prefixes all the time.
[[$vendors = ','|explode:$vendor_prefixes]]
.some-class {
[[foreach from=$vendors item='one']]
[[$one]]box-shadow: 1px 1px 3px #000;
[[/foreach]]
box-shadow: 1px 1px 3px #000;
}
